

By Josh Brown
A customer recently asked us for some example code to let them use VBA in Excel to control a Keithley Series 3706A switch mainframe (sans internal DMM option) with a 3724 multiplexer card. This would allow routing of the signals out to a Keithley Model 2002 8½ digit multimeter to capture high-resolution DC voltage measurements. Now, a user could tether the instruments together and have the 3706A trigger the 2002 to make a measurement after each channel is closed. Then the 2002 could trigger the 3706A when the measurement is complete. But the customer didn’t want something that complex.
What I found the most challenging about this request was a decent “how to” with respect to setting things up in Excel. I searched online only to find content that was out of date and some that simply lacked enough details. I finally dug up enough information, and now I want to share what I found to help those of you who run into the same requests. The following are the basic steps needed to get your VBA+Excel test automation project up and running.
Step 1: Get VISA installed on your system
VISA is the foundation for this example – you need to have it installed if you want to move on. In my searches, I found people had put together samples using the NI-VISA and Keysight VISA. I use the NI-VISA, and you can obtain a copy of the 17.5 Run-Time Engine here.
Step 2: Get Microsoft Excel installed on your system
Yes, I know, you probably already have this program installed, but I had to throw this in. For your information, we use Excel 2016 for this example.
Step 3: Open Excel and save your workbook as a macro-enabled workbook
Create a new workbook and after it opens use the File->Save As option to name your project. Make certain you use the Save as type drop-down control to select Excel Macro-Enabled Workbook option. The macros that you will end up defining are triggered by the controls you will create, and this file type enables the VBA tools you will need to continue.

Step 4: Ensure you have the Developer tab available
If you do not see the Developer tab at the top of you Excel interface:
- Navigate to File->Options
- Click on the Customize Ribbon option in the left-hand pane
- Ensure the checkbox next to the Developer option (right-hand pane under Menu Tabs) is checked.
- Click OK

Step 5: Add a button to connect to and query your instrument’s ID
Click on the Developer tab, locate and click on the Insert (toolbox) option to reveal a set of form controls from which to choose. Select the button control (shown below circled in red; hover over it and you will get a pop-up) and draw a button on the worksheet. After placing and sizing your button, you will be presented with the Assign Macro dialog, where you can define the macro event that will call a function to run some control code that you define. Note how we named this macro “Init_and_ID_Click” because that is what this button will do. Click the New button and this will open the Visual Basic (VB) editor, showing your “Init_and_ID_Click” subroutine template.


Step 6: Add your VISA references
From the toolbar in the VB editor, navigate to Tools->References. Scroll down through the list of available references to locate both “VISA COM 488.2 Formatted I/O 1.0” and “VISA COM 5.9 Type Library.” Select each and click OK.

Step 7: Add Your control code
Review the example below and enter it into your editor. I attempted to capture the high-level concepts via the comments. Note: We used an inline system function reference to Sleep()to add delays where needed, which comes in handy. I am a big fan of creating function wrappers; so the commSend() and commQuery() were an attempt to clean up the overall code.
I expect you already know how to power on your instrument, establish its communications settings, connect your instrument to your computer and obtain the VISA instrument ID. I would like to point out our instrument control string for the DMM6500 shows you how to connect to one of Keithley’s latest digital multimeter options.

Step 8: Click your button, make stuff happen
Navigate back to your main Excel worksheet and click your button. You should see the instrument ID string show up on the cells similar to what is shown below.

That is pretty much all you need to get started – all additional control code to customize your particular application is all up to your imagination or test specifications.
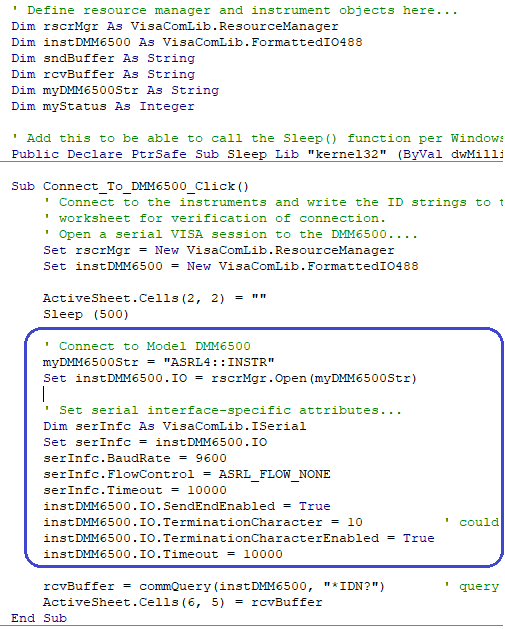
A quick word on using the VISA serial options
While VISA makes instrument connectivity simple, those using a serial port (RS-232) will need to take a few extra steps during setup. Attributes such as baud rate, flow control, termination character and others must align with the instrument configuration. There is an additional object that you must instantiate and link to the instrument object to make these modifications. See how this is handled in code in the image below, which is a portion of an DMM6500 example using the 2001-TCSCAN card to capture thermocouple measurements once a minute for two hours.

Examples to share
We started this post with a reference to a customer example that controls the 3706A and 2002, but in reality we used a DMM7510 to perform the measurements. This example has been posted in the Tek Forum and can be found here. Additionally, the serial example (using the DMM6500) can also be found here.
I hope you found this information helpful and be sure to let us know if you’d like to see more!